SDX cross platform migration
A Clear Guide for Citrix NetScaler VPX on SDX Appliances
Migrating a Citrix NetScaler VPX (formerly ADC, now Citrix NetScaler) instance across SDX appliances, commonly known as SDX cross-appliance migration, is essential for hardware refresh, support continuity, and configuration optimization. This blog guide provides a structured, practical workflow to ensure a smooth and low-risk transition.
Recommended migration workflow
Prepare the Target SDX Appliance
Ensure the new SDX appliance matches the firmware/software version of the source unit for compatibility.Full Backup
Back up the source SDX completely, including all configurations, SSL certificates, and system files.VPX Restoration via HA Failover
Use the high-availability (HA) failover migration method to restore the VPX instance onto the new appliance.Validate Network Settings
Confirm network parameters, such as SNIPs, VIPs, and routing and especially when the new appliance resides on a different network segment.Cutover during Maintenance Window
Schedule and execute the cutover by failing over the VPX and activating the new SDX appliance.Test Thoroughly and Rollback if Needed
Conduct comprehensive tests to verify service integrity. Be prepared to rollback to the prior configuration if issues arise.
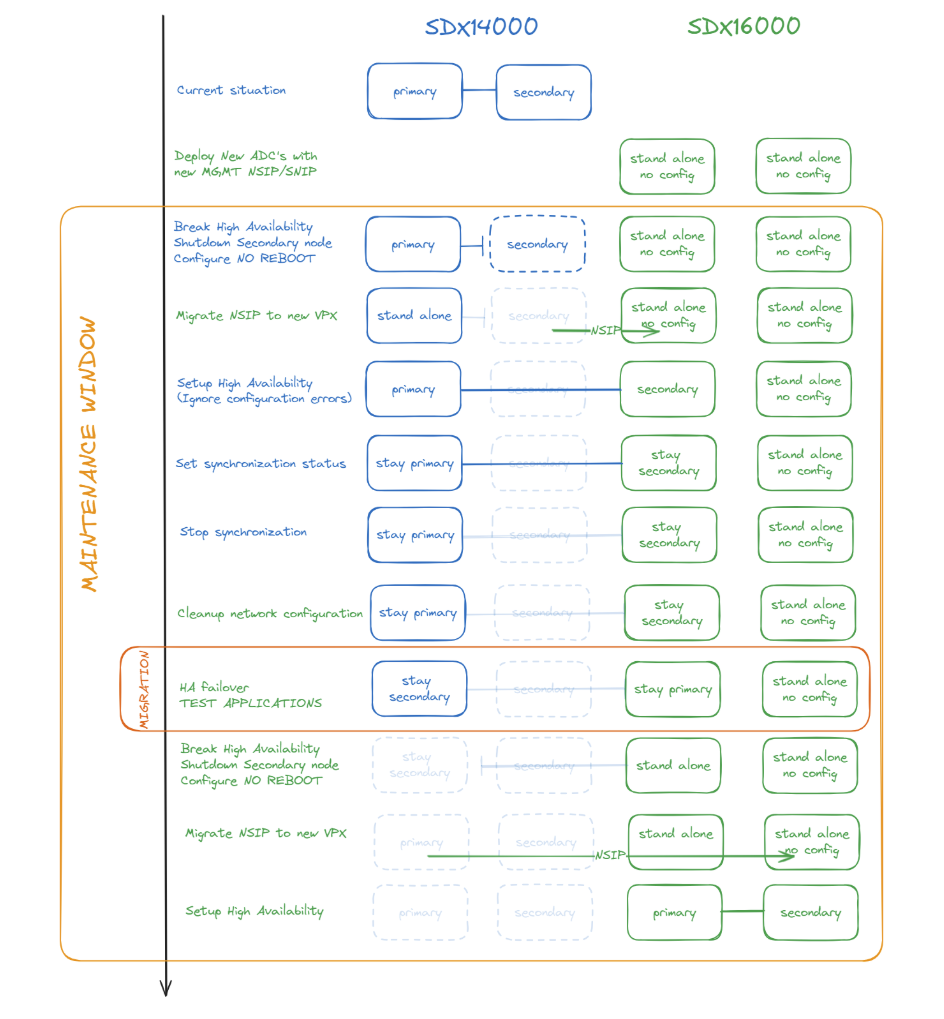
Diagram for the migration approach
Real-World Best Practices
From field experts and Citrix forums, key recommendations include:
Clean configuration files before migration by removing appliance-specific details like NSIP, SNIP, and MAC addresses. Clearing ARP tables on connected switches is also advised.
Use the HA state
STAYSECONDARYto quietly import configurations before the official cutover.Match firmware versions on both VPX and SDX to avoid configuration mismatches or errors.
Migration Checklist by Phase
Phase 1: Pre-migration
Step 1: Deploy new SDX, ensure same software/firmware version between SDX appliances.
Step 2: Configure SVM networking.
Step 3: Apply licensing.
Step 4: Deploy new VPX (same FW build as the old one) with new NSIP.
Pahse 2: Backup
Step 5: Backup up old SDX.
Step 6: Backup up old VPX before the migration.
Pase 3: Start-migration
Step 7: Break the HA and remove old VPX secondary node
Step 8: Shutdown old VPX secondary node and configure no reboot from the XenServer
Step 9: Reassign NSIP from old secondary to new VPX
Step 10: Form an HA pair between the old primary VPX (SDX14000) and the new VPX (SDX16000)
Phase 4: Network validation
Step 11: Check the log file at /var/nssynclog/sync_batch_status.log for errors on new VPX secondary node
Step 12: The interface-related settings might generate errors. Manually fix the bind vlan and set interface configurations.
Step 13: If any other errors are found, manually address them.
Phase 5: Cutover & Testing
Step 14: Enable HA sync and propagation
Step 15: Initiate force ha sync
Step 16: Do a failover, test your services, and rollback if necessary.
Step 17: Start next HA node when the business confirms that the new VPX is working as expected
Advantages of SDX Cross‑Appliance Migration
1. Hardware Refresh & Support Continuity
Migrating to newer SDX models ensures continued support and access to the latest hardware optimizations. As older NetScaler MPX/SDX hardware reaches end‑of‑support, updating becomes essential for reliability and compliance.
2. Consolidation & Efficiency
Deploying services on new SDX appliances provides an opportunity to clean and consolidate configurations, eliminating legacy cruft.
Tight consolidation can lead to better resource allocation and streamlined operations.
3. Opportunity for Cleanup and Improvement
Migration forces a review of existing configurations—SSL certs, ns.conf, VIPs, SNIPs, etc.—offering a chance to reallocate, reorganize, and clean up configurations.
4. Reduced Risk Through Phased Migration
A controlled, service-by-service or HA‑based approach allows for a smoother migration with fallbacks. This is seen as the “least disruptive and least risky” for the business.
Challenges and Considerations
1. Downtime and Operational Risk
Migration can entail service interruption. Without careful planning (e.g., staging or phased approach), it may result in extended downtime.
Complex configurations increase the risk of failure during migration.
2. Compatibility & Configuration Discrepancies
New firmware (e.g., NetScaler 13.1) may deprecate legacy features like classic policies or portal themes. Configurations relying on deprecated elements may break.
Migrations across different network segments (management or data) do not automatically port routing rules; these must be recreated manually.
3. HA and Clustering Limitations
Clustering across heterogeneous environments, especially mixing hardware or virtual platforms, is unsupported and unreliable.
4. Certificate and File Transfer Complexities
SSL certificates, service-specific keys, and custom configurations in /nsconfig/ssl or ns.conf must be carefully transferred. A reboot that saves an unintended config may overwrite migrated settings.
5. Limitations in Support and Troubleshooting
While Citrix support provides valuable assistance, its responsiveness and effectiveness can vary. Organizations undertaking complex migrations may benefit from supplementing it with additional resources.
Final Thoughts
Cross-appliance migration on the Citrix SDX platform offers a prime opportunity for hardware renewal and configuration improvements. Success hinges on detailed planning, compatibility checks, and strong rollback strategies. Importantly, Citrix officially supports the HA failover migration method, providing a reliable path for businesses to modernize safely.
For deeper insights on supported hardware and migration specifics, refer to Citrix official documentation:
Migrate the configuration of a NetScaler instance across SDX appliances
Need tailored migration support?
Whether it’s risk mitigation, scheduling, or rollback planning, Blubyte’s seasoned experts are ready to craft a migration strategy unique to your infrastructure.
Get in touch to schedule a direct consultation with our top Citrix NetScaler specialists.

